
Efficient and cost-effective heating with infrared: your benefits at a glance
Cost efficient
Not only do you benefit from lower purchase costs, but maintenance and ancillary costs are also eliminated.
Simple installation & retrofitting
No specialist electrical work is required for installation, which can be carried out easily and without any problems.
Rapid heat production
Depending on the positioning and room size, the heating panels can create a noticeable temperature difference within a very short time.
Heating of the future - How does infrared work
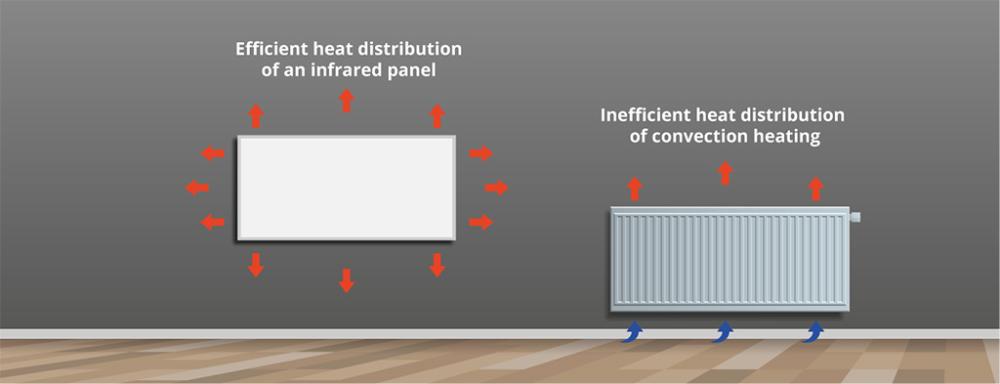
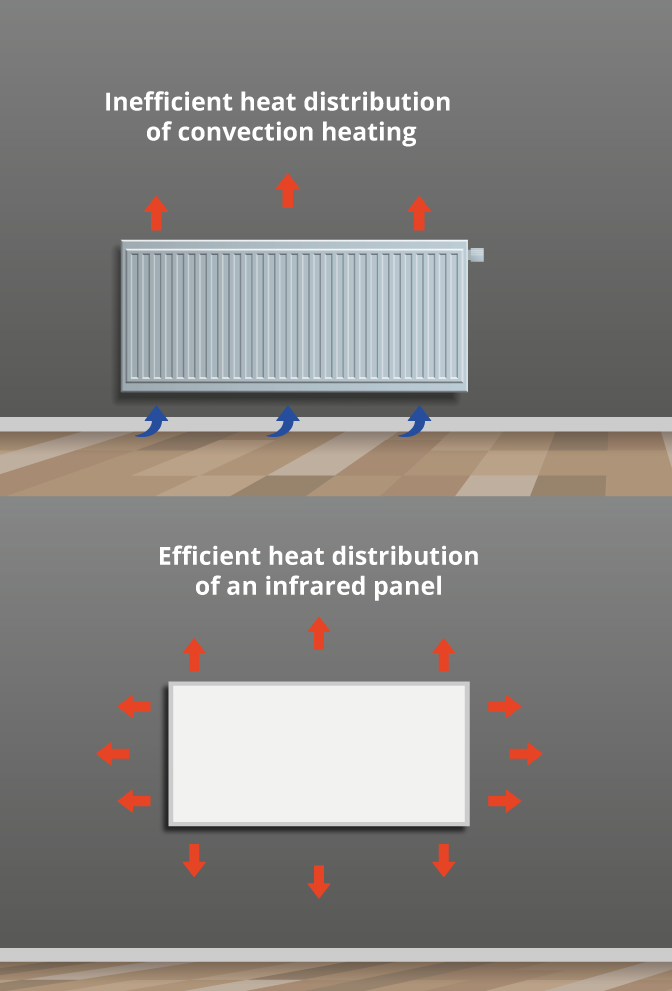
When we talk about infrared, we mean a frequency in the electromagnetic spectrum. In addition to low-frequency UV light, high-frequency infrared radiation is also invisible to humans. However, this does not mean that we do not perceive infrared radiation. Unlike UV radiation, infrared radiation is not harmful to humans. Our infrared heaters work with infrared C (3,000 nm - 10,000 nm), a far infrared radiation in which people can stay without restriction. In general, infrared panels consist of a housing and a heating element through which electricity flows.
The heating element also serves as an electrical resistance and ensures that the energy is completely converted into heat and emitted in the form of infrared radiation. This process is more efficient than the way convection heaters work, as the ambient air does not have to be warmed up first. The heat generated by the infrared panels is stored by objects and walls, which means that the room does not cool down immediately when ventilated.
Your advantages at a glance
-
 Costefficient to purchase
 -
Adaptable and space-saving in use
-
beneficial for the indoor climate
-
Installation without specialist electrical work
-
Easy conversion to infrared possible
-
Maintenance-free operation
-
prevents and helps against mold growth
-
Unique design
-
Hardly any air & dust turbulence
Your expert for infrared panels
Our top priority is the highest quality and sustainability. We are committed to offering you products that not only meet the highest standards, but are also manufactured in an environmentally friendly and responsible manner. At the same time, you benefit from an excellent price-performance ratio and consistently high availability of our products, so that you always get what you need - and at fair conditions.

Application areas
Our infrared heaters can be combined with our LED light frames. So you can combine heating and light!


1.
Determining the heating requirement
The first and most important question before purchasing an infrared heater is:
"What is my requirement and how many infrared panels do I need to cover it?"To determine your heating requirements, factors such as the insulation of the room, the size and the period of use must be taken into account.
We will be happy to help you calculate your heating requirements.
Send us your inquiry!


2.
Positioning makes all the difference
When positioning the panels, both ceiling and wall mounting are possible. To achieve the best result, however, you should consider the following when positioning the panels:
- Avoid positioning opposite reflective surfaces such as glass or windows. The heat cannot be stored as well due to the reflection and is therefore lost.
- Make sure that the radiation from the panel is not obstructed by furniture or curtains that are too close.
- Older buildings often have damp exterior walls. Mounting on an interior wall is suitable here. This exposes the outer wall to light and allows it to dry out.
- If the panel is positioned on the ceiling, it should not be mounted directly above seating areas, as the direct radiation is often perceived as unpleasant.
3.
The right product selection
Once the results of the above two steps are available, the right product can finally be chosen. We will be on hand with our professional expertise to help you find a solution that meets all requirements.


4.
Planning the control system
To ensure that the panels are easy to operate, the last step is to choose the appropriate control system. Whether radio wall-mounted transmitters, thermo switches or motion detectors, there are virtually no limits when it comes to control. The use of a thermostat ensures that your room always has the right temperature.
Infrared circuit diagrams with light frame
Manual switching
Only applies to 8123435: If the two external wires are connected by a switch (NO contact), the relay switches and the IR panel is activated. Alternatively, the relay (8123435) or the radio-controlled socket (8123439) can be switched on and off using a radio button (8123436/8123437). *For model 8123435, the two external wires must be short-circuited temporarily (e.g. for the winter months) or permanently via a connection terminal.


Motion-dependent switching
Only applies to 8123435: The two external wires are connected via a switch (normally open contact) (e.g. during the winter months) or permanently short-circuited via a connection terminal. The relay (8123435) or the radio-controlled socket (8123439) is then automatically switched on by the motion detector (8123440) if someone is present in the detection area. As soon as no one moves (after 6s, 15s, 1m or 5m), the IR panel is automatically switched off again.
Ambient temperature-dependent switching
Only applies to 8123435: The two external wires are connected (e.g. only during the winter months) via a switch (normally open contact) or permanently short-circuited via a connection terminal. As a result, the relay or the radio-controlled socket (8123439) together with the IR panel is automatically switched on by the temperature sensor (8123438) as soon as the temperature falls below the set room temperature. As soon as the room temperature reaches the preset level again, the IR panel is automatically switched off.


Recommended:
Ambient temperature and motion-dependent switching at the same time
Only applies to 8123435: The two external wires are connected (e.g. only during the winter months) via a switch (normally open contact) or permanently short-circuited via a connection terminal. As a result, the relay or the radio-controlled socket (8123439) and thus the IR panel is automatically switched on by the temperature sensor (8123438) as soon as the temperature falls below the set room temperature. If someone is now in the detection area of the motion detector, the second relay also switches through and the IR panel is activated.
After a certain time (6s, 15s, 1m, 5m) after the last motion detection in the room, the wireless motion detector sends a switch-off command to the coupled relay. However, if the relay or the radio-controlled socket remains switched on (e.g. because it is still too cold in the room/bathroom), this can be achieved by sending a switch-on impulse from outside the room via the radio remote control. Entering the room then starts a new switch-on/switch-off cycle, controlled by the motion detector (after 6s, 15s, 1m, 5m).
Simultaneous control of several IR panels
A wireless push-button (8123436) and each of the two buttons on the double wireless push-button (8123437) as well as a single thermal switch (8123438) or a single motion detector (8123440) can be coupled with several relays (812435) or wireless sockets (8123439).
All components must be within the radio transmission range of the transmitter (radio push-button, thermal switch, motion detector) so that all linked relays or radio-controlled sockets can be switched on or off by this one transmitter.
A single relay or a single radio-controlled socket can also be linked to several radio remote controls in order to switch one or more IR panels on or off, e.g. from both ends of a corridor or office room.
Note: The wireless thermal switch or wireless motion detector ‘does not realise’ when the relay linked to it has been switched on or off via the wireless remote control. They both send an on or off command based on the programme set for them, regardless of any commands from other controllers that have occurred in the meantime, and ‘override’ them.
The perfect room temperature with a thermostat
A thermostat compares the actual temperature with the target temperature. If the actual temperature is below the target temperature, the infrared heater switches on until the corresponding room temperature is reached. In order to optimize heating operation, thermostats often have various functions for regulating the temperature.
When positioning the room thermostat, it is important to ensure that the temperature is also measured there. The thermostat should therefore not be positioned too close to the heating. Incorrect or ill-considered positioning can falsify the thermostat's measurements and the desired room climate may not be achieved as a result. The same applies to cool places, for example next to windows, places exposed to constant sunlight or behind curtains.

Discover our product range
- Panels in 10 different sizes
- Top price-performance ratio
- High radiation efficiency
- IP44 protection class
- Surface temperatures up to 105°C


Depending on the size, our infrared panels can also be used in grid ceilings.

Heating and lighting solution in combination
You can upgrade your heating to a lighting solution without any problems with a light frame. The simple light frames create pleasant lighting and are dynamic white and dimmable.
The light frame can also be used independently of the infrared heater. Thanks to the advanced design, the service life of the LEDs is not affected by the heat from the infrared panel.
The frames are supplied ready to plug in and can be connected to the power supply without any problems.

Frequently asked questions
Yes, it is possible. When heating with infrared panels, you already save on the purchase price. Compared to conventional heating methods such as gas, geothermal energy, pellets or a heat pump, the costs of infrared heating are considerably lower. With good insulation, electricity consumption also remains low. When calculating requirements, each room must be considered individually, as factors such as room size, window area and period of use also play an important role.
If a room is poorly insulated or not insulated at all, it is clear that the energy consumption is much higher than in a well-insulated room. Our heating requirement calculator can be used to weigh up whether it is still cheaper than using convection heating. In older buildings with a damp outer wall, we recommend fixing the panel to the inner wall. Irradiation promotes drying and therefore also improves thermal insulation.
If the opposite walls reflect the heat from the infrared panel, it is not absorbed as well. Particularly in tiled bathrooms or in rooms with large window areas, attention should be paid to the positioning of the panel. If the heat radiation is reflected by the opposite wall instead of being absorbed, it loses energy.
Depending on how the electricity used to operate the heating is generated, infrared heaters are the most sustainable solution. If the infrared panels are operated in combination with a photovoltaic system, they are not only very cost-effective, but also a sustainable heating solution for the environment.
Yes, the infrared panels and light frames are supplied ready to plug in. This means that no specialist electrical work is required. It is advantageous to have some manual skills to attach the infrared panel to the ceiling or wall.
With a radiation angle of 178 degrees, the panels cover a large area. This beam angle is already noticeable from 60 degrees. With a maximum radiation range of up to four meters, a room can be heated without any problems, as the heat hits a sector to be heated, such as walls, floor or ceiling, within this radius.
With an average service life of 100,000 heating hours, our panels are very durable. Depending on the product, we offer you a guarantee of up to 7 years.
Both the heating panel and the light frame can be controlled independently of each other if both have their own power supply.